Contest Super Simulator (CSS)
- Introduction
- Download & Install Contest Super Simulator
- Initial Contest Super Simulator Setup
- Change Sound Device Sample Rate to 48000 Hz
- Set Up WriteLog
- Download & Install VB-Cable Virtual Audio Device
- Set Up VB-Cable Virtual Audio Device
- Set Up MMTTY
- Contesting with CSS
Contest Super Simulator (also referred to as CSS) is a program written by Wayne Wright, W5XD, and introduced to the public in July 2016. It interfaces directly with WriteLog to simulate either single radio or SO2R (on one PC) RTTY, CW and SSB contesting in a very realistic manner.
WriteLog version 12.07 or later is required in order to run Contest Super Simulator in full RTTY mode. Therefore Contest Super Simulator in RTTY mode will only run on Windows 7 or later. CSS will also run on the WriteLog Demo Version but only in a limited capacity.
These instructions will show how to set up Contest Super Simulator for RTTY, but also include steps to activate the simulator on CW, if desired.
A virtual audio cable (to be downloaded & installed separately) will be used to “connect” the audio from Contest Super Simulator to the audio input of the RTTY engine. In our example, we will use MMTTY as the sound card engine for RTTY within WriteLog and we will set it up for one radio. SO2R setup will come later.
Contest Super Simulator uses low RTTY tones consisting of 1275 Hz for Mark and 1445 Hz for Space. If you normally use a different tone pair, it’s OK. These instructions will show how to change the settings in MMTTY to use low tones with the simulator.
The instructions on this page are to download & install CSS, set up CSS & WriteLog in order to make sure the simulator is working, download & install a free virtual audio cable (if you don’t already have one installed on your PC), and finally to change settings in CSS and MMTTY in order for the simulator to work as expected.
Download & Install Contest Super Simulator
1. Download Contest Super Simulator from the WriteLog website here. Read the information on the webpage to learn more about CSS. To download, go to the Installation section of the web page (as shown in Figure 1 below), enter your callsign and click the Download button.
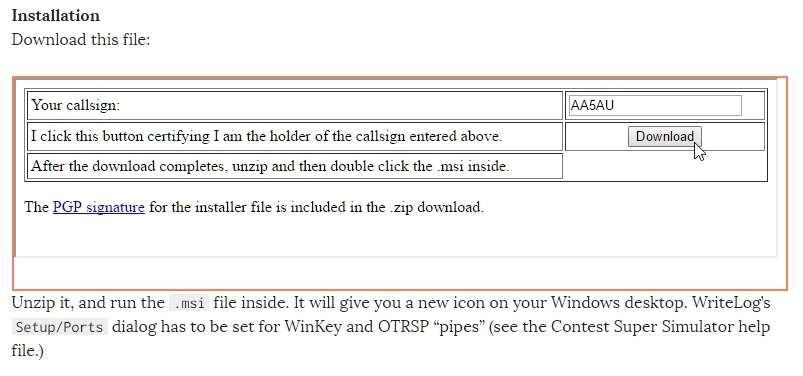
Figure 1
2. Run the .msi installation file inside the zipped file you download. (NOTE: The file you download may be named differently than what is shown in Figure 2. As the simulator gets updated, the version number will change).

Figure 2
Running the .msi installation file will install the program, place an icon on your desktop, and create a start menu folder called Contest Super Simulator.

Figure 3
Initial Contest Super Simulator Setup
3. Double click the Contest Super Simulator icon to start the simulator. When CSS starts the very first time, it opens to the Settings Screen (Figure 4).
The four areas highlighted in red are what need to be set initially. Headphones is where you select which sound device will be used to listen to the RTTY tones. Be sure there are speakers or headphones connected to whatever sound device you select. (NOTE: These instructions will first have you set up the simulator to make sure it is working and that you can hear RTTY tones coming out of your speakers or headphones attached to a sound device. Once that is achieved, you will be instructed to make changes in order to send the RTTY tones from the simulator, via a virtual audio cable, to MMTTY in order to print RTTY in WriteLog’s Rttyrite window).
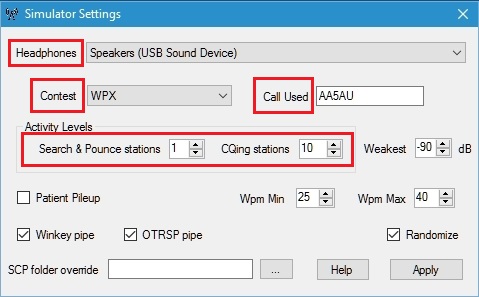
Figure 4
4. Use the drop-down menu to set the Headphones selection to a device which will be used to listen to RTTY tones transmitted from the simulator. In this example, a set of speakers are attached to a USB Sound Device (which is a USB sound card). Set Contest to WPX, put your callsign in the Call Used box, set Search & Pounce stations to 1 and CQing stations to 10. Leave all other options as shown in Figure 4. When finished, click Apply to close the settings screen. When you close the settings screen, you will see the CSS main window (Figure 5). Before going any further, click the checkbox for Show simulator messages as shown in Figure 6. This will be used later.
NOTE: If you receive the message shown in Figure 7 when you close the Simulator Settings screen, then you need to change the sampling rate of your sound device. Click Yes and follow the instructions starting in Step 5. If you do not receive this message, continue to Step 6 – Set Up WriteLog.

Figure 5
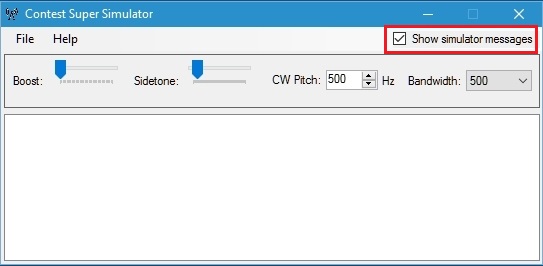
Figure 6
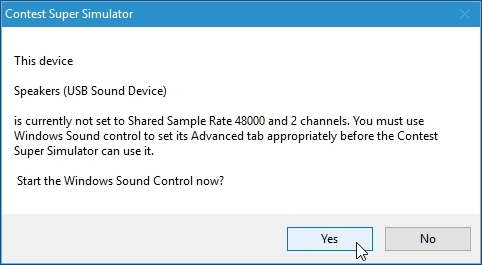
Figure 7
Change Sound Device Sample Rate to 48000 Hz
5. After clicking Yes when you receive the warning screen shown in Figure 7, the Sound screen opens. Be sure the Playback tab is selected at the top, highlight which sound device you need to change, and select Properties as shown in Figure 8. (Note: It is also recommended you close any applications that may be using the sound device such as a music player or web browser.)
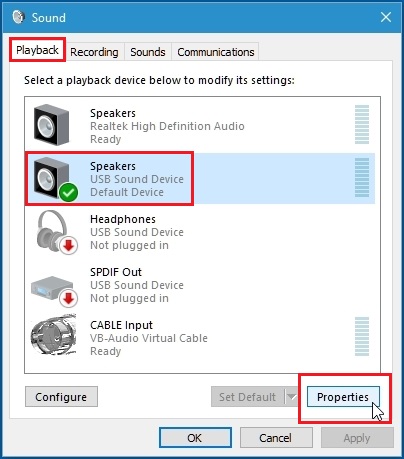
Figure 8
In the Properties screen for the sound device selected (Figure 9), go to the Advanced tab screen and use the drop-down menu to select “16 bit, 48000 Hz (DVD Quality)“, then click OK. Click OK again in the Sound screen to close it. (NOTE: The contents of the “shared mode sample rate” drop-down menu varies among sound board device drivers. CSS can use either the 24-bit or the 16-bit variations of 2 channel, 48000Hz).
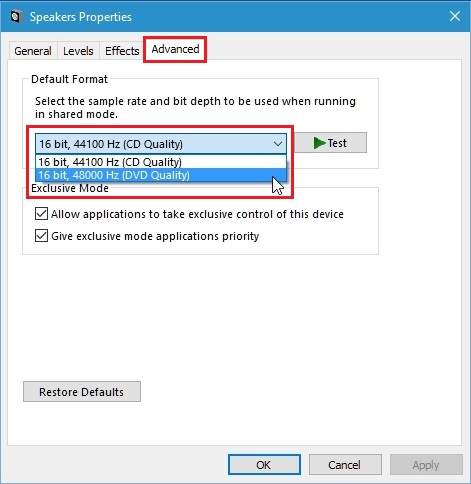
Figure 9
Once the sound device is set for 48000 Hz sampling rate, continue to Step 6. (NOTE: If your sound device does not have a 48000 Hz option, there is a workaround (pending). Jump to Download & Install VB-Cable Virtual Audio Device and perform steps 13 through 20 now. This sets the Headphones option in CSS to the VB-Cable Virtual Audio Device instead of your local sound card but it also allows you to listen to the audio sent from the VB-Cable Virtual Audio Device in your local speakers or headphones (Step 18 & Figure 24). When finished, come back to Set Up WriteLog at Step 6.
6. Leave the main Contest Super Simulator window open but move it off to the side. Open WriteLog and choose to start a new contest and select CQ WPX Contest: RTTY. Do not start a Telnet Packetcluster connection. If one is started, close the Telnet session.
Now save the file to a filename like TEST or something else you like. Be sure the CSS and WriteLog windows do not overlap. You want to be able to see the CSS window.
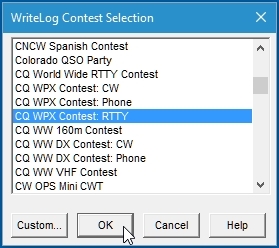
Figure 10
7. In order for the simulator to work in RTTY mode, WriteLog must be set up for RTTY. There are a couple of ways to achieve this. If you normally use radio control with WriteLog, turn on your radio and set it to RTTY mode. WriteLog will read the radio and set the frequency and FSK in the QSO Entry Window as shown in Figure 11. Using radio control with WriteLog is the best way to use the simulator since it allows you to tune the radio to tune in stations generated by CSS. (NOTE for Version 12.07 users only – If you are using WriteLog version 12.07, then you must set the radio to the LEFT radio. Go to the WriteLog Radio menu > This Window is… > … Radio Left. This will place a green L to the right of the frequency/mode button in the QSO Entry window.)
It’s also important that your radio not key PTT while using the simulator. You don’t want your radio to transmit. Disable PTT, go to the Port menu in Rttyrite and set the Port to None. If it is already set to None, then perhaps you key PTT via radio control. To disable that, go to the main WriteLog screen and then select Ports. In the Ports screen un-check Comm PTT for the port where you have your radio selected. If you use AFSK and key your radio using VOX, disable VOX on your radio.
If you use radio control and FSK is showing in the QSO Entry Window, skip Step 8 and continue to Step 9. (NOTE: Even if you normally transmit AFSK RTTY with WriteLog, go ahead and set your radio to RTTY (or FSK) mode to use with the simulator. You do not need an FSK connection to use CSS.)
If you do not have radio control set up with WriteLog, then you must manually tell WriteLog you are running RTTY. Proceed to Step 8.

Figure 11
8. To manually set up WriteLog to show FSK in the QSO Entry Window (and you are not using radio control), click on the button shown in the QSO Entry Window (refer to Figure 12).

Figure 12
When The Logging/Duping Frequency for the current Entry Window screen opens, manually type in a frequency in the Select frequency box. In the Select mode area, select FSK, then click OK.
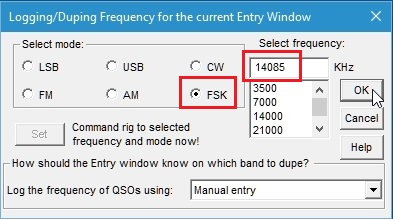
Figure 13
The frequency you typed and FSK should now be present in the QSO Entry Window.

Figure 14
NOTE: For a single radio in RTTY mode, the simulator should now be running and you may skip steps 9, 10 & 11 and continue to Step 12. For CW simulations, or for RTTY SO2R, you’ll need Steps 9,10 & 11.
9. For CW mode (single radio or SO2R) or SO2R RTTY, you will need to make changes in the Ports setup menu. Once the frequency and FSK are showing in the QSO Entry Window, go to the Setup menu in WriteLog and select Ports.
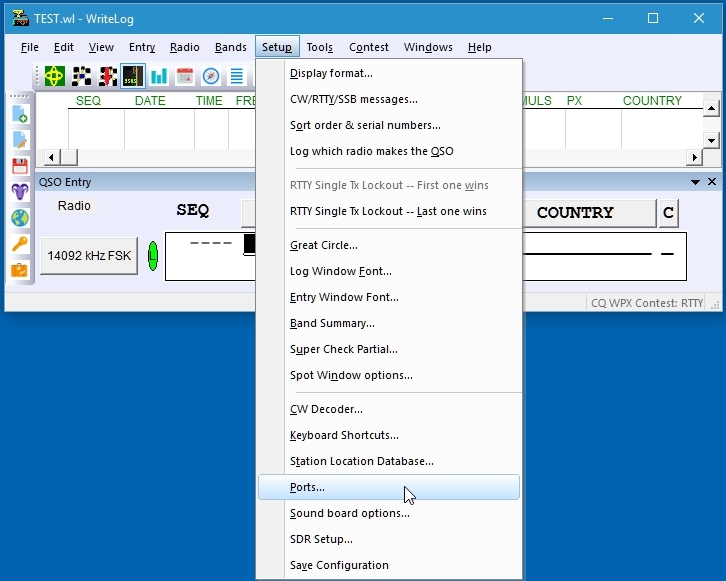
Figure 15
10. In the Port Setup screen, go to CW keyer type and use the pull-down menu to select “Winkey+OTRSP pipes” as shown in Figure 16 (NOTE: If “Winkey+OTRSP pipes” is not present in the CW keyer type pull-down menu, then you need to upgrade WriteLog to version 12.07 or later.)
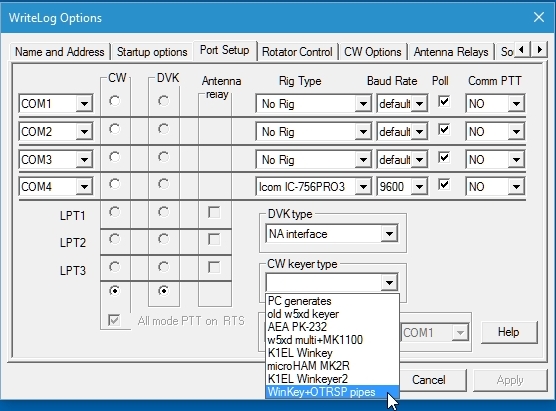
Figure 16
11. When you select “Winkey+OTRSP pipes” as the CW keyer type, notice the same “Winkey+OTRSP pipes” option will also populate the SO2R Control (Figure 17). This is important, not just for single radio CW operation with CSS, but for SO2R RTTY & CW operation as well.
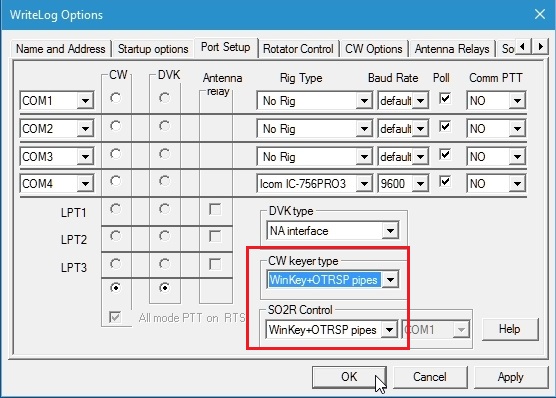
Figure 17
After making this selection, click OK. (NOTE: If you had a band map open in WriteLog, making any changes in the Port Setup tab screen causes the band map to close when you exit the Port Setup window. This is normal. You should go ahead and open a band map window now even if you did not have one open previously). Open a bandmap window by going to the Windows menu and selecting Band Map or click the Band Map icon on the toolbar, if the toolbar is present.
Once you close the Port Setup screen, the simulator should start running.
(NOTE: After making these changes in WriteLog, be sure to save your configuration by going to the Setup menu and selecting Save Configuration. This way, you won’t have to go through these steps again the next you open WriteLog.)
12. The first tell-tale sign that the simulator is working is when you see lines of text show up in the simulator message area similar to what is shown in Figure 18. If lines like these (they may not be exactly as shown here) show up in the simulator message area, then the simulator is indeed working. If you see an error message in the message area, then the simulator is probably not working.
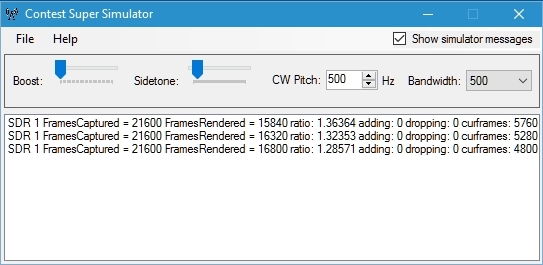
Figure 18
If you do not have a band map open, open a band map now (WriteLog Windows menu > Band Map). If you are using radio control and the band map shows the frequency of the radio, you should start seeing callsigns populating the band map. If you are not using radio control, then you must set the center frequency of the band map by right-clicking inside the band map window and selecting “Set Center frequency”. When the Center frequency window opens, type in the same frequency that you typed in Step 8.
Clicking on a callsign in the band map should result in RTTY tones being heard in the speakers or headphones you selected in CSS setup.
If you do not immediately hear anything when you click a callsign on the band map, wait a few seconds. If you still don’t hear anything, click on a different callsign and see if you hear RTTY tones. If you still don’t hear RTTY tones, check to make sure your speakers or headphones are working.
At this point, you must hear RTTY tones from your speakers in order to continue. Once you confirm you hear RTTY tones, continue to Step 13.
Download & Install VB-Cable Virtual Audio Device
13. In order to route RTTY tones from Contest Super Simulator to MMTTY, you will need a virtual audio cable (VAC). If you are familiar with virtual audio cables, you may already have one installed on your PC. If so, you may use it in place of the suggested VAC shown here. If you do not already have a VAC installed on your PC, you will need to download and install one.
I have found a virtual audio cable on the Internet that works with CSS. It’s from VB-Audio. VB-Cable Virtual Audio Device is free to download and install but it’s not freeware. Instead, it’s Donationware, which means if you decide to use it then you should donate to the author. According to the author, you set the price of your donation.
To download VB-Audio Virtual Audio Device, go to the VB-Audio webpage at http://vb-audio.pagesperso-orange.fr/Cable/index.htm. Look for the orange Download button. Be sure you download the VB-Cable Driver as there are other downloads on this page. What you are looking for is shown in Figure 19. Download the zipped file VBCABLE_Driver_Pack43.zip onto your hard drive.
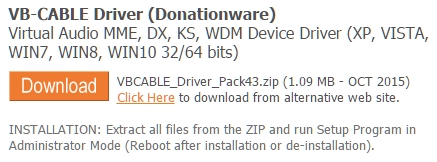
Figure 19
14. Extract all files from the zipped file. There are two setup files as shown in Figure 20. Run the first file (VBCABLE_Setup.exe) if your Windows system is 32-bit. If your Windows system is 64-bit, run the second file (VBCABLE_Setup_x64.exe).

Figure 20
Set Up VB-Cable Virtual Audio Device
15. When the installation is complete, confirm the device was installed on your system by going to the Windows Control Panel and choosing Sound or right-click the speaker icon on the task bar and select Sound. In the Sound window you should see the device labeled CABLE Input (Figure 21). This is the VB-Audio Virtual Cable. Click it once to highlight and then click the Properties button.
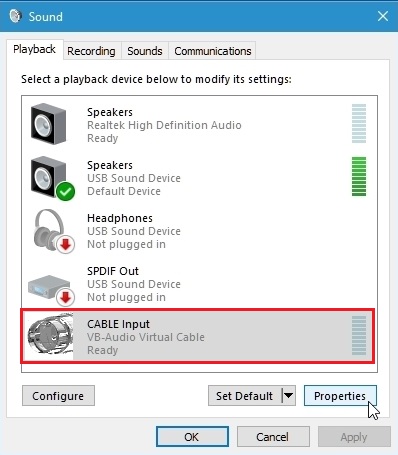
Figure 21
16. When the CABLE Input Properties windows appear, select the Advanced tab and confirm the sample rate is set for 16 bit, 48000 Hz (DVD Quality), then click OK.
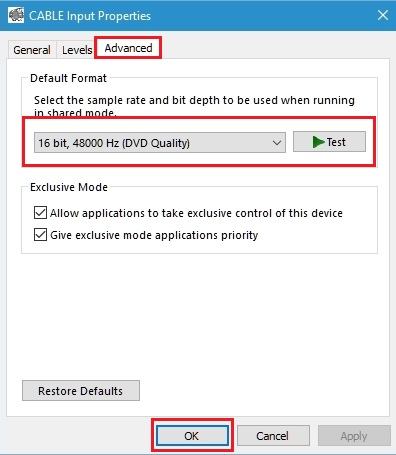
Figure 22
17. Back at the Sound window now select the Recording tab. Highlight Cable Input and select Properties.
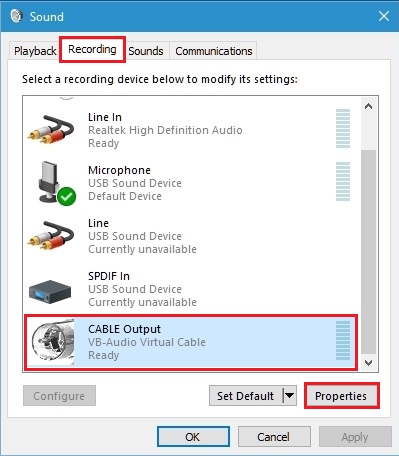
Figure 23
18. In Cable Output Properties, select the Listen tab. Check the box Listen to this device and use the Playback through this device drop-down menu to select which device you would like to hear the RTTY tones. This should be the same device where you originally listened to the RTTY tones in Step 3. Click OK when finished and OK again to close the Sounds window.
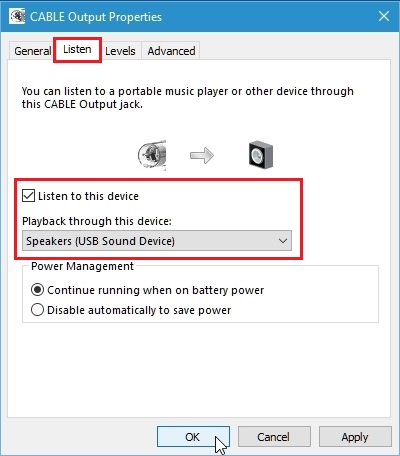
Figure 24
19. Open CSS if it is not already open. Open Settings from the File menu.

Figure 25
20. Select CABLE Input (VB-Audio Virtual Cable) in the Headphones drop-down menu. Click Apply to close the settings window.
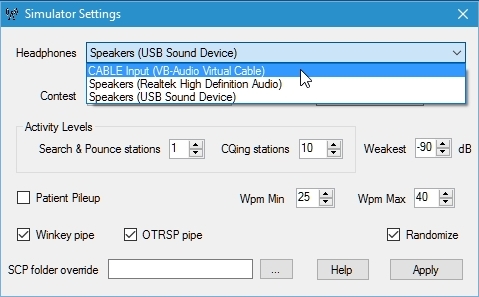
Figure 26
21. In the CSS main screen, click Show simulator messages if it is not already selected. VB-Cable set up is now complete within the simulator.

Figure 27
22. Before making changes to MMTTY, it would be beneficial to write down any settings before you change them. This way you can go back to your original settings when you are not using the simulator.
Open WriteLog. Open Rttyrite if it’s not already open. If MMTTY is not already set as the TU Type, select either XMMT.ocx or MMTTY (if available) via the TU Type menu. (NOTE: The MMTTY option – not shown in Figure 29 – is only available if the MMTTY Plug-in for WriteLog is installed. The MMTTY plug-in is not necessary to use CSS. The preferred way to use MMTTY with WriteLog is now with XMMT.ocx. For more information on how to run MMTTY with XMMT.ocx go to https://www.rttycontesting.com/tutorials/writelog/xmmt-support-for-mmtty-2tone/#Running_MMTTY_from_XMMT.ocx.)
Once MMTTY is open in Rttyrite, select Setup(O)… from the Options menu in the MMTTY RTTY Control Panel as shown in Figure 28. (NOTE: It’s possible you are set up to not show the menu buttons in the RTTY Control Panel. If that’s the case, you will need to open MMTTY Settings via the Setup XMMT.ocx window. To do this, go to the Rttyrite TU Type menu and select TNC Setup as shown in Figure 29, then when the Setup XMMT.ocx window opens, select XMMT Setup as shown in Figure 30.)
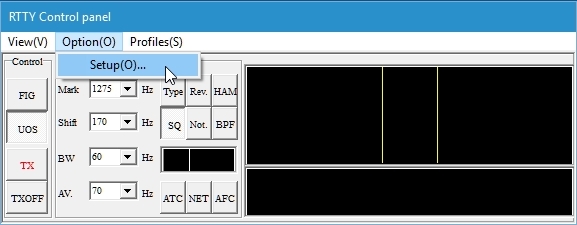
Figure 28
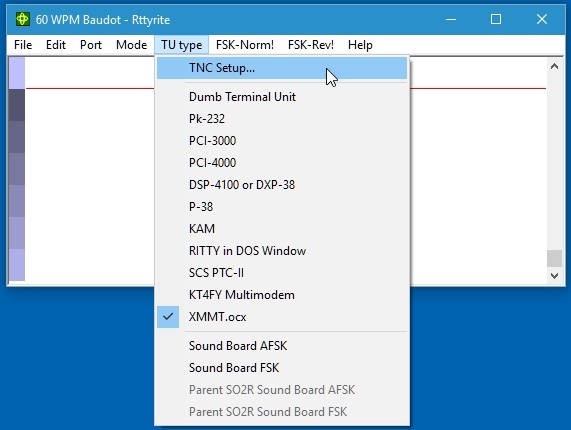
Figure 29
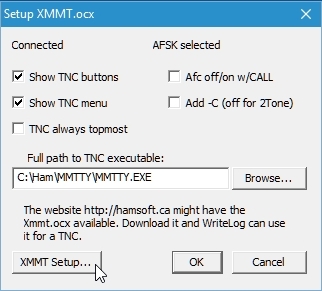
Figure 30
23. When the MMTTY Setup window opens, it should open to the Demodulator tab screen. On the Demodulator tab screen, change the Mark frequency to 1275 Hz. Also change the Ham Default to 1275. When finished, click on the Misc tab.
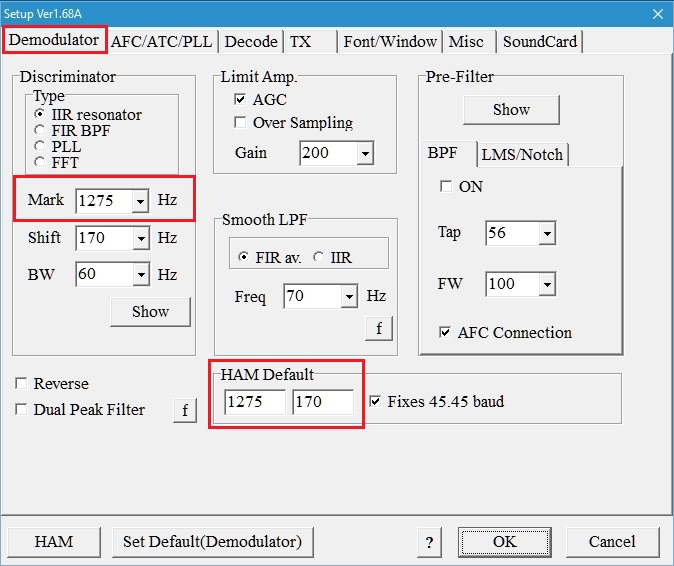
Figure 31
24. On the Misc tab screen, select Sound as the TX Port. When finished, click the SoundCard tab.
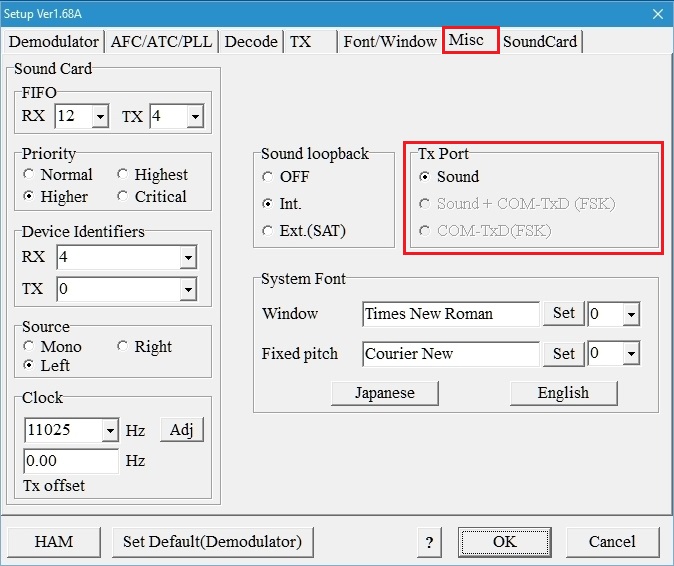
Figure 32
25. On the SoundCard tab screen select CABLE OUTPUT (VB-Audio Virtual) under Reception and select the device you use to listen to the RTTY tones under Transmission (this should be the same device used in Step 3.) In this example, a USB Sound Device is used to listen to the RTTY tones. The Reception setting is where MMTTY will receive the RTTY tones from the simulator. The Transmission setting is where you will listen to RTTY tones that you will transmit to the simulator.
Click OK to close the setup window and everything is now ready to go with the simulator.
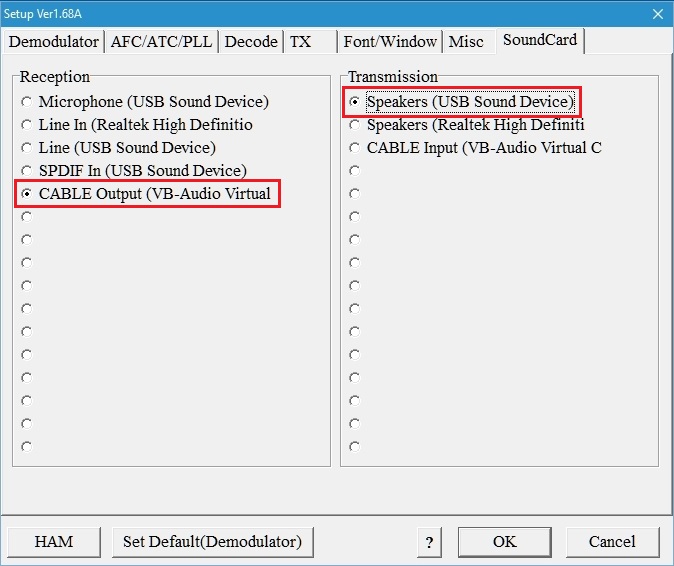
Figure 33
Before diving in and practicing contesting, it is highly recommended that you read the entire Help file. The Help file is not very big and can be read in just a few minutes. It contains valuable information about all the settings.
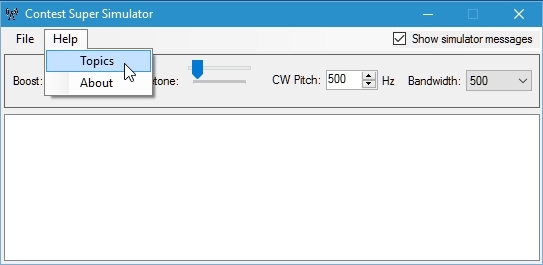
Figure 34
Using the simulator is about as close to operating an actual contest as you can get. You will find that the stations created by the simulator do not always send the same exchanges and do not behave the same way each time. Figure 4 shows a session with CSS. As you can see, it’s just like a real contest. Stations answer your CQ and there are stations on the band map that you can work. When you call one of these stations, they should come back to you.
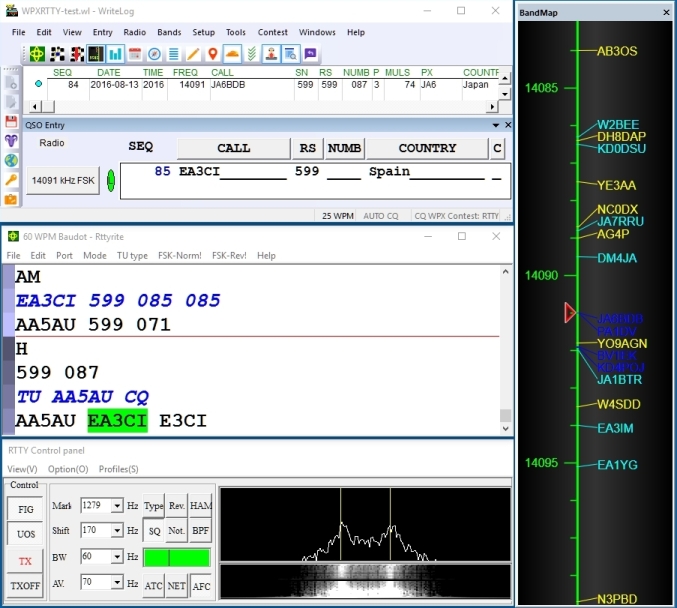
Figure 35
There are many things you can do with CSS. You can operate SO2R on a single PC, either on CW or RTTY mode. To do this, you configure WriteLog for 2 Radios (Left and Right) and set up an instance of MMTTY for each of the radios. In MMTTY you set up the Left radio for Left channel of the VB audio cable and Right radio for the Right channel of the VB audio cable.
You can also run SO2R RTTY on two PCs by running the simulator on both PCs at the same time. Running audio to one pair of headphones when operating SO2R on separate PCs may take some ingenuity but it can be done. Or not use headphones at all; instead use speakers on each PC.
